Are you keen to automate your trading, but feel a little trapped as you use the powerful, but somewhat archaic looking Interactive Brokers (IBKR) Trader Workstation (TWS) trading platform?
Don’t give up hope, I may have the answer for you!
Firstly, some affiliate links – just in case you feel like supporting this blog (yes, I will get paid if you sign up after using one of these, but at no additional cost to you):
Real Life Trading (RLT)– Mountains of high quality free training, as well as paid mentoring and trading rooms if you are looking for additional assistance. Fantastic community of traders. I haven’t found a more supportive and responsive community. Make sure you check them out – I can’t recommend them highly enough (if you’re not sure, they run free weeks a couple of times a year, so make sure you check one of those out).
Interactive Brokers – yes, it’s archaic looking, but it is powerful, fees are fairly low, and is a good option for traders in many countries
Trading View – fantastic charting tool, allowing alerts and custom code development. Connects directly to Interactive Brokers so you can place trades from their charts.
Despite a fairly extensive feature set, IBKR is not known for keeping it’s technology on the cutting edge, and is notoriously difficult to integrate with. This has been a little limiting for those of us that are keen to enter the world of automated trading (also known as “bot”, “robot” or “algo” trading).
But don’t give up on your plans to enter the automated trading world just yet, as there is an option available to you…
I was digging around trying to find things that integrate with IBKR, and stumbled across Capitalise.ai.
Advertising itself as “Code-Free Trading Automation”, integrating with IBKR, and being zero cost, I was intrigued, so decided to setup an account and test it out.
Initial Setup
The setup process for capitalise was not overly intuitive, but this guide (https://capitalise.ai/interactivebrokers-how-to-start/) on their website did a fairly good job of walking through it.
Once you have completed all the steps in the above, it took about 24 hours before the account was actually setup, and I could start to tinker with it.
Once your account is setup, you are ready to create and test your first strategy.
Note that at this point, you are still only able to backtest strategies and simulate trading. I strongly recommend working with the backtesting and simulate trading until you feel comfortable with the system and are confident with your strategies.
Setting up your first strategy
Capitalise.ai advertises itself as “code free”, and whilst this is the case, it does not mean that it is entirely intuitive. Fortunately, they do offer a lot of online training, videos and live demonstration sessions, as well as a heap of sample strategies that you can clone and adjust if you want to.
To get you started though, I will show you how I went about setting up a simple moving average crossover strategy that I learnt through Real Life Trading.
The rules I will configure for the strategy are as follows:
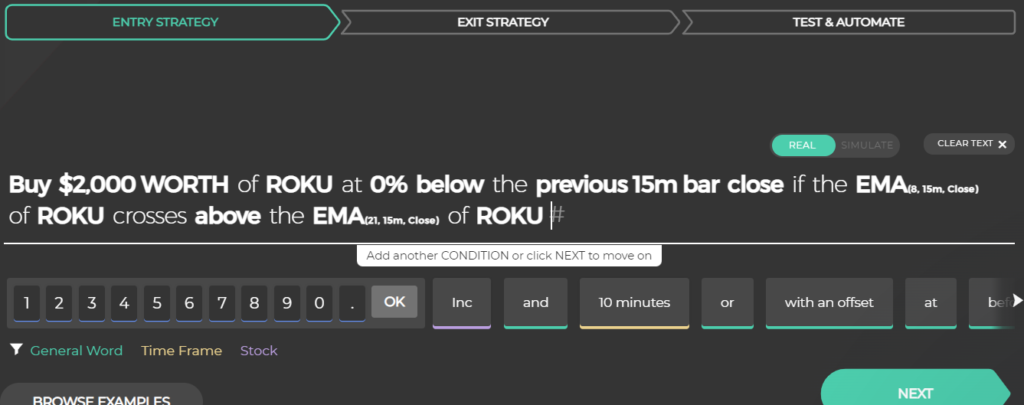
– Entry: Buy if the 8 candle EMA crosses ABOVE the 21 candle EMA, submitting a limit order to buy at the same price as the close of the candle on which it triggered
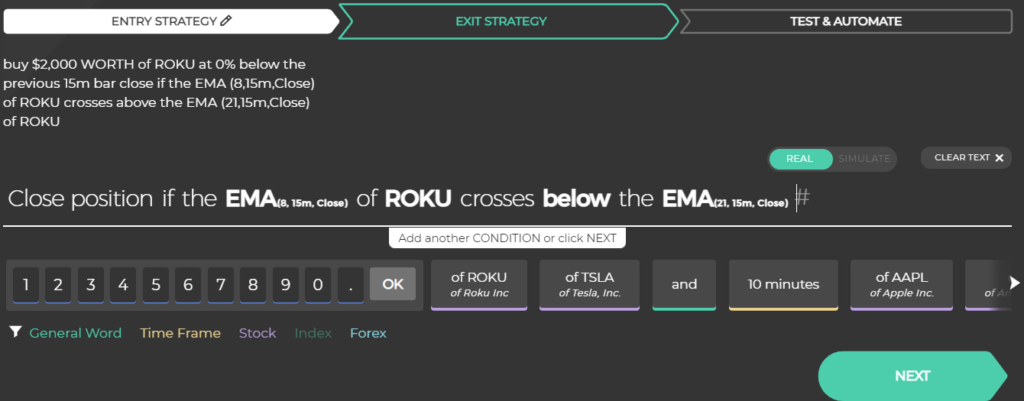
– Exit: Close position with a market order if the 8 candle EMA crosses BELOW the 21 candle EMA. Note that there is no stop loss in this strategy, the exit point is determined by when the EMAs cross.
– Quantity: $2000 USD worth
– Timeframe: 15 minute
– Stock: ROKU
To create a strategy, start by clicking the big green button “Create New Strategy” in the left hand menu:

There are two components to configure a strategy – the Entry condition, and the Exit condition. To follow the plan above, the entry conditions would be setup as follows:

The exit condition would be entered as shown below.

The final step is the confirmation screen, but also has a few settings to be aware of:

Run In-loop: Turn this on to allow the strategy to trigger an entry multiple times
Hits Limit: Set this to limit the number of times the strategy is able to trigger an entry. I have left this blank for this strategy.
Strategy/Stop-Loss: This is the total amount that can be lost on this strategy before it is halted. I have left this blank for this strategy.
All done. Check through your settings for the entry and exit condition to confirm you have everything correct.
From here, I suggest backtesting the strategy.
If it is an untested strategy, I would also recommend running it in simulation mode until you are happy that it is profitable. Simulation mode paper trades the strategy in real time, entering and exiting simulated trades as per the strategy rules, allowing you to test the strategy for as long as you like without risking any money.
Once you are ready to run it live, connect up your live account (see below), and set it running!
The Good
A couple of things I like about this platform:
– Once you get used to it, it is pretty intuitive to use, and does allow you to automate strategies with no code
– It is possible to trigger your entry/exit conditions based on an alert from Trading View. So even if you run into limitations with this platform, if you can achieve it in Trading View, you can use it to trigger your entry or exit in Capitalise.ai
The Bad
And a couple of things I think could be improved
– Currently, backtesting is limited to the last 90 days. You can pick a shorter timeframe, but it can never go back further than 90 days. In my opinion, this is really not enough to determine how a strategy will perform in different market conditions
– I generally trade using the “R” system – using a fixed risk (or “R”), and buying the number of shares based on the difference between the entry price and the stop loss. Currently it is not possible to use this type of risk management on the platform.
– the timeframes seem to be fixed – for example, you can’t use a 78 minute timeframe that is sometimes used with this strategy. Although it would likely be possible to work around this by using Trading View alerts.
Connecting to your live account
Once you have setup some strategies and tested them, it is relatively simple to connect to your live account. On the left hand menu, click the “Connect Trading Account” link (see image below):

to start the process. This is relatively simple, requiring a form to be filled out and a scan of your ID (driver’s licence or passport required) to be uploaded, as well as an online signature (possibly the most difficult part of the entire process, particularly if you are using a mouse).
Conclusion
I am still very new to the Capitalise.ai platform, but so far there is a lot to love about it. As an IBKR user, I have often wished for automated trading capability, so I am looking forward to seeing how it performs as I continue to test it. Whilst there are a few limitations, the ability to trigger a strategy from a Trading View alert means that a lot of these can be overcome.
Overall, pretty impressed, and looking forward to continuing my testing.
Bonus
If you want to get started by looking at the strategy shared above, here are the links to two versions of it – the first is defines the entry and exit conditions if you are looking to go long (buy to enter) with the strategy. The second defines the entry and exit conditions for using the strategy to go short (sell to enter) on the stock. Feel free to have a look, clone these, and make them your own!
Note that you will need to have configured your capitalise.ai account in order to view these.
Long: https://interactivebrokers.capitalise.ai/wizard?share=QyPVvSOtWKeQ&tutorial=skip
Short: https://interactivebrokers.capitalise.ai/wizard?share=gXVIA5T2D65n&tutorial=skip